Bonitasoft’s UI Designer enables developers to design rich application pages, forms, and responsive user interfaces. It simplifies the process of creating, saving and exporting application pages, process forms, layouts and custom widgets, with each component having its own significance. The UI Designer is built taking the AngularJS stand and is a standard feature of Bonita application platform starting from version 7.x.
This blog explains the instantiation of a workflow (process) through an external page via contract functionality. Here’s an overview of the process, a case is generally created using Bonita Studio or Bonita Portal; data from a custom page or form is sent to the process via contract. For a custom page, the data available on a page is utilized to instantiate the process.
Creating Custom Page / Form
Launch Bonita UI Designer by clicking on UI Designer icon available on the toolbar or click on Open UI Designer option available under Development menu as shown below.
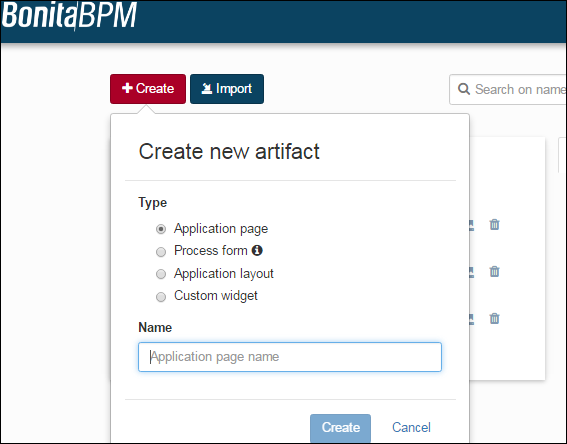
This action opens a browser window with Bonita UI Designer application. Click on the +Create button to create a new application page. Give a name to the page as ‘MyCustomForm’ and then click on Create button, which creates an empty page.
To add content to the custom page, drag sufficient inputs and date widgets from the left pane to palette (whiteboard), edit widget properties using the widget properties panel. To capture data from input widget, a data variable must be created and bound to it. Follow these instructions to create a data variable and bind widgets data.
Creating Data Variables
Click on Create a new variable button to open a new window. Add the following information in the variable window.
- Enter variable name as ‘formInput’
- Select the type as JSON
- Paste the below code in the value area
[java]{
"user_info_refInput" :{
"fname":"",
"lname":"",
"dob":null,
"phone_num":""
}
}[/java]
- Click on Save button
As shown, the formInput JSON variable is created successfully and it is visible in variables section. The structure of JSON is defined by contract and default values (initial values), which are provided for its attributes.
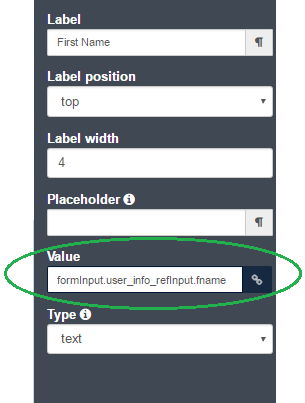
The variable ‘formInput’ is used to collect user data. In order to collect widget specific values of variables, the value part in widget property must point accordingly. Here is the process to set values of a widget.
Setting Widget Properties
After selecting a widget in the palette, open property editor pane. Change the value portion of each widget with correct value information. Here’s an illustration for the label First Name.
Creating Output Variable
An output variable is required to send information to Bonita engine, which in turn uses the formInput variable (created earlier to capture user data). The output variable must also produce JSON data and has to be populated dynamically, hence it is recommended to select the Type as ‘JavaScript’ instead of ‘JSON’.
- Create a new variable by clicking on Create a new variable button
- Input ‘formOutput’ in Name field
- Select Type as ‘Javascript expression’
- Input below code in Value field
[java]return {
'user_info_refInput': $data.formInput.user_info_refInput
};[/java]
The ‘formOutput’ variable is a JavaScript expression, which returns a JSON object. It is important to note that object structure must match with contract requirements and should be filled with formInput. Upon submission, values entered/modified are first attached to ‘formInput’ and subsequently ‘formInput’ is attached to ‘formOutput’. The ‘formOutput’ data is forwarded to Bonita engine for further processing.
Creating Bonita Process
This section explains the process of creating workflows and contracts using Bonita studio.
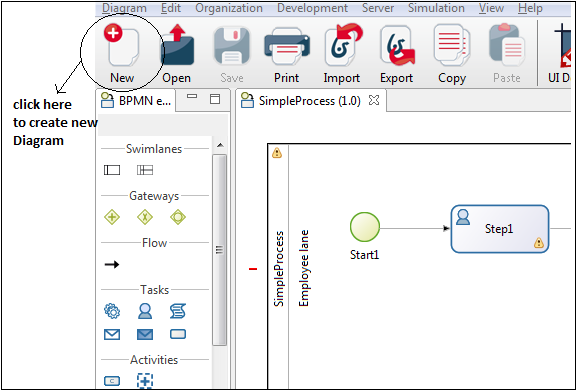
- Click on New button to create a new process diagram with a simple ‘start1’ and ‘step1’ activities.
To rename the process, click on outer lane and select process diagram from the properties section. Click on the edit button to rename process and change the name to SimpleProcess.
Creating Business Data Model (BDM)
Business Data is the information shared between processes and applications; it is a set of business objects in the Business Data Model (BDM). There is one BDM that is generally used by all processes and applications in a tenant. Subsequently, when a process is instantiated (case is created), specified business objects are instantiated (as required) turning as variables within the process instance.
Steps to Create Business Data Model
- Go to Development menu, select ‘Business Data Model’ and then click on Manage, which will open a dialog box to manage the business data model.
- There are two sections in BDM manage dialog box, the left section helps in creating complex objects (name of the BDM), whereas the right side section helps in creating attributes for complex objects. Click on Add button to include a corresponding entry in the list. Specify the data type for that particular attribute in the right section.
- Click Add button and provide a name to the BDM. Here, in this case, we have labeled it as ‘UserData’.
- Add the variables under ‘UserData’ business object.
Defining Business Variables
In the previous sections, we have explored the process of creating a data model. However, it is important to understand how data model is applied to a process by creating business variables. The variables can be either created for a complete process, specific task or an activity.
Creating Business Variables
- Navigate to the Data tab available on details panel. Click on ‘Add’ button available under pool variables this opens a dialogue box.
- Provide a name to the variable; in this case, it is ‘user_info_ref’.
- From the drop-down select data type (This drop-down menu lists all available business data models), in our case, it is ‘UserData’.
- Provide initial data (if required) and click on ‘finish’ button to save the definition of a variable.
Creating Contracts
A contract specifies a piece of information that a process requires to be started. Without this information, a process cannot execute its business logic. To be more precise, a process refuses to create an instance without this information.
How to Create a Contract
- Go to Details panel > Execution tab > Contract pane.
- From Inputs tab, click on Add from data, which opens a pop-up for creating a contract using business data variables that are defined in the process.
- Select user_info_ref and click Next and Finish buttons to create a process.
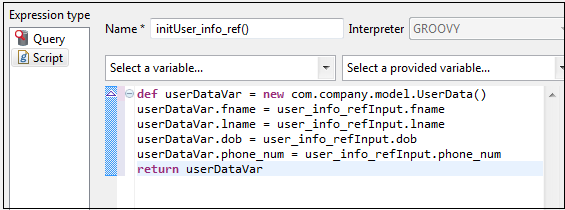
After a contract is created, the initial values, i.e. initialization script for the business variable is set automatically. Follow these steps to view it.
- Select the pool and go to Details panel > Data tab > Pool Variables pane.
- To view the generated code, double-click on user_info_ref to edit and click on pencil icon present near default value field. Here’s how the code appears.
Instantiation BPM Process
Step 1 — Building URL
Bonita process can be instantiated from any application page. To accomplish this, a URL must be built connecting to the process to instantiate the process.
- Open MyCustomForm page (created earlier).
- In the Variables panel (available at bottom of palette), click on Create a new variable button to create a variable.
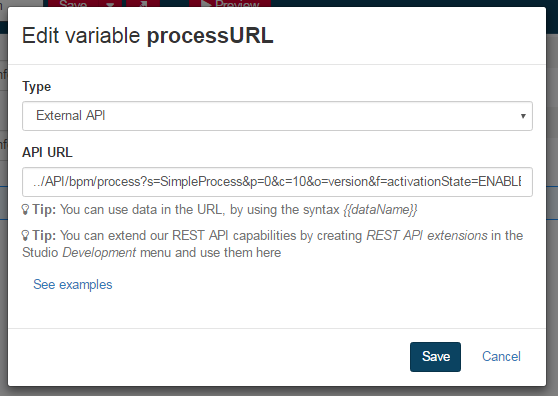
- Enter variable name as ‘processURL’.
- Set type of variable as External API.
- In API URL field copy and paste the below URL.
../API/bpm/process?s=SimpleProcess&p=0&c=10&o=version&f=activationState=ENABLED
The above URL makes a REST call to Bonita engine. You can refer the complete Bonita API reference here. As you can observe, the URL points to a process name called SimpleProcess mentioned as a query string parameter ‘s’. Subsequently, by changing the name of a process, the same URL can be used to hot another process.
Step 2 — Process Instantiation URL
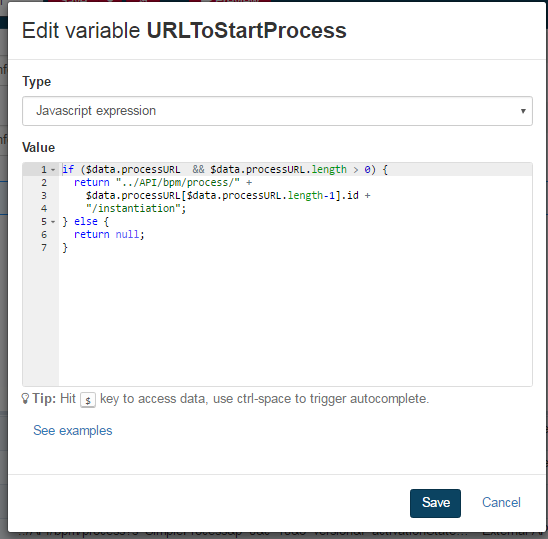
- Create a JavaScript variable with the name URLToStartProcess.
- Enter the following code in the field value.
[java]if ($data.processURL && $data.processURL.length > 0) {
 return "../API/bpm/process/" + $data.processURL[$data.processURL.length-1].id +"/instantiation";
} else {
 return null;
}[/java]
Step 3 — Sending Data on Submit
The variables created appears as shown in the illustration below.
- Select Submit button from MyCustomForm.
- Set the action of the button to post.
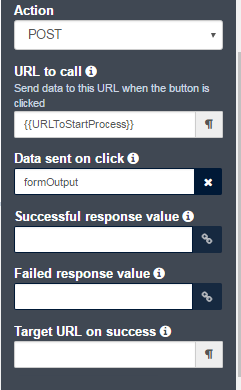
- Change the URL to call and Data sent on click fields as shown in the illustration below.
Here’s an overview of properties mentioned in the above image:
- URL to call is an actual URL to which a REST call is made on button click. Angular brackets {{ }} convey that it is an Angular expression.
- Data sent on click consists of variable/data that is submitted to REST web service. Note: variable must return JSON data and the structure should match the contract that is defined in Bonita process.
- Successful response value is the value that is returned by REST service informing that the call is successful.
- Failed response value is the value that is returned by REST service informing that the call has failed. This also includes the cause for REST call failure.
- Target URL on success is a URL to which a user is redirected on a successful REST call.
On clicking Submit button, data present in the formOutput variable is bound to process instantiation contract and a case is initiated. Subsequently, the data is stored in a database.
Conclusion
By following the steps outlined above, Bonita cases can be easily created not only from a Bonita custom page but also from any web page. Bonita UI Designer is a powerful tool that enables developers to create amazing custom pages and forms by utilizing its flexible and rich user interface. The UI Designer tool is quite easy to use and enables enterprises to significantly increase efficiency and productivity. By creating feature-rich UI Designer, Bonitasoft has given global businesses a solid foundation to improve processes and develop new applications seamlessly.
Evoke’s BPM Consulting Services
At Evoke Technologies, we bring over a decade’s experience as one of the industry’s best IT services companies. Our dedicated teams of highly trained BPM experts will come to know your business almost as well as you do, trusting your expertise in what you do to inspire us as we design and deploy customized BPM solutions to help you do it even better.
Further, with core technical competencies in the latest business process design standards (BPMN 2.0) and programming languages (like Java), premier partner status with Bonitasoft (the world’s fastest-growing provider of BPM services), and our customer-centric approach to planning and implementing business process strategy, Evoke can support you to develop and deploy right BPM solutions for your business needs. To learn more about our BPM consulting services, contact us online or call us at +1 (937) 202-4161 (select Option 2 for Sales).
Author
 |
Venkata Subbaiah Pasupuleti is a Software Engineer at Evoke Technologies. He is competent in Core Java, Web Application Development, Spring, Hibernate, HTML, and CSS. Venkata has a good grasp of Bonita BPM open source software and its functionality. He is part of multiple Bonita BPM projects at Evoke. |







3 Comments
Nice article
I want to ask a question, can we add an external page developed using angular or react to the portal?
How to execute above code