Docker is an emerging open-source container technology that is redefining the constantly shifting IT landscape. Docker enhances the way business enterprises package, deploy and manage their software applications. Globally, enterprises are being influenced by the endless opportunities Docker promises. In addition, large software companies such as Google and Microsoft are exhibiting keen interest in Docker, making it a hot topic of discussion among the DevOps community and other IT groups. This blog post will help educate individuals and enterprises about setting up a private Docker registry that will run from its own backyard.
Technology news websites and discussion forums feature extensive discussions of Docker images and containers. The concept of containerization is widely viewed as the future of software development. Hence, greater emphasis must be placed on the security implications of adopting Docker. Enterprises need to ensure that things are in the right place, so that the Docker images are safeguarded using their own private infrastructures. These security concerns drive the concept of the Private Docker Registry, which enables enterprises to store/upload images and access them later utilizing secure authentication methods.
Any DevOps professional working with Docker containers will have come across three important use cases: ‘pull an image’, ‘push an image’ and ‘delete an image’. Let us begin by discussing each use case in detail.
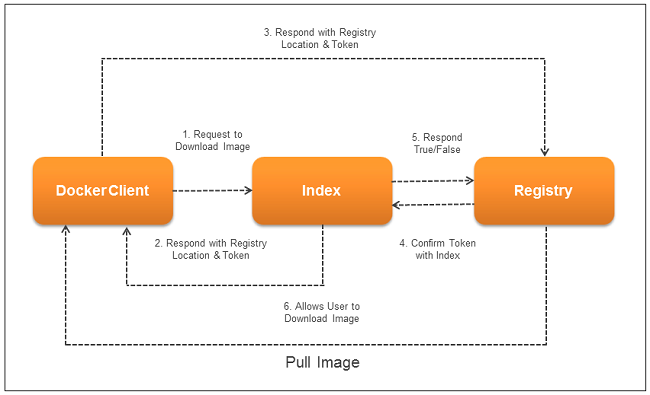
Pulling an Image
Generally, when an end-user requests a Docker image from the index, that request would return the response along with registry details forming a chain. Moreover, the Docker client requests the registry internally, so pulling a Docker image involves a combination of index, client and registry modules.
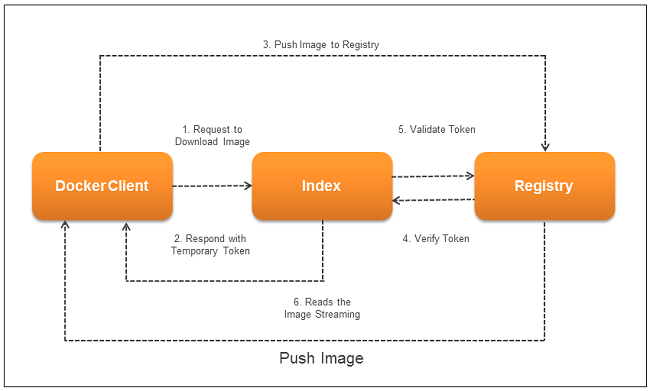
Pushing an Image
When an end-user requests the Docker index to obtain registry information in order to push an image, the image has to be directly pushed into the registry. As it is a private Docker registry, it will authenticate the user and respond accordingly to the user request.
Deleting an Image
Deleting an image is also performed from the Docker repository; however, it is important to note that deletion of images does not require the Docker index, as the index is generally used to store private Docker images.
What are the Docker Index and Registry?
Before we initiate the process of setting up a private Docker registry, let us understand the Docker index and registry. Basically, the Docker index has the registry information, whereas the Docker registry internally authenticates the user with the index and responds to the user. The process for installing and running a private Docker registry follows below.
Steps to Install a Private Docker Registry
The Docker registry is a Python-based application; therefore, the prerequisites for setting up a private registry are as follows:
- Step 1 – Install Python
- Step 2 – Install Private Docker registry
In the use case below, we used an Ubuntu 14.04 machine. Thus, the commands that are frequently used in Ubuntu, such as apt-get, have been utilized for installation.
Installing Python
- In order to install Python on the Ubuntu system, use the code below.
[java]
$ sudo apt-get -y install build-essential python-dev \ libevent-dev python-pip liblzma-dev swig libssl-dev
[/java]
Installing Docker Registry
- Install Docker registry on the Ubuntu machine:
[java]
$ sudo pip install docker-registry
[/java]
- Update the Docker registry in the Python package and also update the configuration file (path shown below):
[java]
$ cd /usr/local/lib/python2.7/dist-packages/config/
[/java]
- The Docker registry comes with a default config_sample.yml file. Make sure you copy the config_sample.yml file to config.yml to create basic configuration.
[java]
$ sudo cp config_sample.yml config.yml
[/java]
The Docker container stores data in a temporary directory that is cleaned during the booting process. To avoid any data loss, users should create a permanent directory. In the current use case, we have created /var / directory to store our data. Correspondingly, update the config.yml file in the two locations mentioned below and replace the temp location with /var/. Here is the code that helps users perform this action:
First Location Code
[java]
sqlalchemy_index_database
_env:SQLALCHEMY_INDEX_DATABASE:sqlite:////var/docker-registry/docker-registry.db
[/java]
Second location code
[java]
Local: &local
storage:local
Storage_path: _en:STORAGE_PATH:/var/docker-registry/registry
[/java]
To run the Docker registry in a secure manner, we have used the Python Web Server Gateway Interface (WSGI) HTTP server.
[java]
$ sudo gunicorn –access-log-file – — debug -k gevent -b \ 0.0.0.0.5000 -w 1 docker _registry.wsgi.application
[/java]
Steps to Run the Private Index and Registry
In order to run the private index and registry, accomplish the following three core activities:
- Deploy the index components and registry from GitHub
- Configure Nginx with Docker registry
- Set up SSL for secure communication
The key steps in deploying index components and registry from GitHub follow. Index components include Nginx and Apache-utils for password authentication. Docker registry and Python can be installed from GitHub.
Starting the Linux Service
Here is a quick overview of how to initiate the Linux service:
- Create a directory for the Docker registry tool
[java]
$ sudo mkdir -p /var.log.docker-registry
[/java]
- Update the file in the Docker registry configuration
[java]
$ sudo vi /etc/init/docker-registry.conf
[/java]
- Update and save the Docker-registry file
- Run the Docker registry service
[java]
$ sudo service docker-registry start
[/java]
- Use apache-utils to secure the registry by enabling password protection feature
[java]
$ sudo apt-get -y install nginx apache2-utils
[/java]
- Create credentials to access the Docker registry
[java]
$ sudo htpasswd -c /etc/nginx/docker-registry.htpasswd rakesh31
[/java]
- Access the Docker registry using the generated credentials
Configuring Nginx with Docker Registry
Let us now figure out how to enable Nginx to use the authentication file to forward requests to the Docker registry. The steps below would help users configure Nginx with Docker Registry.
- Create the Nginx configuration file:
[java]
$ sudo vi /etc/nginx/sites-available/docker-registry
[/java]
- Update the configuration file with appropriate commands:
[java]
Upstream docker-registry
Server localhost:5000
}
Server {
Listen 8080;
server_name serv_name.com;
Proxy_set_header Host $http_host;
Proxy_set_header X-Real-IP $remote_addr
Client_max_body_size 0;
chunked_transfer_encoding on;
location / {
# let Nginx know about our auth file
auth_basic "Restricted";
auth_basic_user_file docker-registry.htpasswd;
proxy_pass http://docker-registry;
} location /_ping {
auth_basic off;
proxy_pass http://docker-registry;
} location /v1/_ping {
auth_basic off;
proxy_pass http://docker-registry;
} }
[/java]
- Restart the Nginx service and create a soft link
[java]
$ sudo ln -s /etc/nginx/sites-available/docker-registry \ /etc/nginx/sites-enabled/dcker-registry
$ sudo service nginx restart
[/java]
Verification and Troubleshooting
The steps below enable users to ascertain if the actions have been performed correctly.
- To ascertain whether the actions above are executing properly, run the following command:
[java]
$sudo curl localhost:5000
[/java]
- Check if Nginx is working as desired:
[java]
$curl localhost:8080
[/java]
- The output would take the form of an unauthorized message. Retry using this command:
[java]
$ curl rakesh31:rakesh31@localhost:8080
[/java]
The steps above will confirm the Docker registry is secure and password-protected.
Setting up SSL for Secure Communication
Create a file that will host the server for data encryption, which is the final step to setup the SSL on a local machine.
[java]
server {
listen 8080;
server_name evokejenkin;
ssl on;
ssl_certificate /etc/ssl/certs/docker-registry;
ssl_certificate_key /etc/ssl/private/docker-registry;
[/java]
Signing the Certificate
- Sign the security certificate:
[java]
$ sudo mkdir ~/certs
$ sudo cd ~/certs
[/java]
- Generate the root key using SSL:
[java]
$ sudo openssl genrsa -out devdockerCA.key 2048
[/java]
- Generate the root certificate:
[java]
$ sudo openssl req -x509 -new -nodes -key devdockerCA.key -days \ 10000 -out devdockerCA.crt
[/java]
- Generate a key for the server:
[java]
$ sudo openssl genrsa -out dev-docker-registry.com.key 2048
[/java]
- Once all the above commands are executed, a certificate signing request is made. To avoid any signature-related errors, please ensure the ‘Common Name’ field is correctly named (Server name).
[java]
$ sudo openssl req -new -key dev-docker-registry.com.key -out \ dev-docker-registry.com.csr
[/java]
- To sign the certificate request:
[java]
$ sudo openssl x509 -req -in dev-docker-registry.com.csr -CA \ devdockerCA.crt -CAkey devdockerCA.key -CAcreateserial -out \ dev-docker-registry.com.crt -days 10000
[/java]
- We now have all the files ready to run the installed certificate. Place these files in the right location:
[java]
$ sudo cp dev-docker-registry.com.crt /etc/ssl/certs/docker-registry
$ sudo chmod 777 /etc/ssl/certs/docker-registry
$ sudo cp dev-docker-registry.com.key /etc/ssl/private/docker-registry
$ sudo chmod 777 /etc/ssl/private/docker-registry
[/java]
- Correspondingly, a known authority must sign the self-signed certificates, in order to confirm the certificate is legitimate.
[java]
$ sudo mkdir /usr/local/share/ca-certificates/docker-dev-cert
$ sudo cp devdockerCA.crt /usr/local/share/ca-certificates/dockerdev-cert
$ sudo update-ca-certificates
[/java]
- Restart the Nginx to reload configuration and SSL:
[java]
$ sudo service nginx restart
[/java]
- Test the certificate:
[java]
$ sudo curl https://rakesh31:rakesh31@server:8080
Update the docker file with the below value in the etc/default/docker
/etc/default/DOCKER_OPTS="–insecure-registry server:8080"
[/java]
Pushing the Image to Private Docker Registry
The instructions below will help users push images to the newly created private Docker registry.
- Create an image in the local machine:
[java]
$ sudo docker run -t -i ubuntu /bin/bash
[/java]
- Commit the image:
[java]
$ sudo docker commit $(sudo docker ps -lq) rakesh-image
[/java]
- Docker registry login to the private registry:
[java]
$sudo docker –insecure-registry=server:8080 login https://server:8080
[/java]
- Users are prompted for the credentials; the result will be displayed on the screen.
- Tag image to push into the registry:
[java]
$sudo docker tag rakesh-image server:8080/rakesh-image
[/java]
- Use push command to upload the image to the registry:
[java]
$sudo push server:8080/rakesh-image
[/java]
Pulling an image to the newly created private Docker registry:
[java]
$ sudo docker pull server:8080/rakesh-image
[/java]
Conclusion
This post certainly covers all the aspects of setting up of a private Docker registry. Users can pull and push images to the Docker registry using this blog post as a reference. Docker registry V1 has the ability to store images and graphs for a set of repositories; however, it does not have a notion of user accounts or authorization. Moreover, Docker registry V1 only delegates authentication to the Index using tokens. Additionally, there are a few drawbacks in this version, which are addressed in their new version 2.0. Docker registry version 2.0 simplifies image definition, improves security and decreases the probability of backend corruption, which future posts will discuss.
The primary agenda for setting up the Docker registry is to distribute code/images among the authenticated coders to have it reviewed, and to use the images across the team or enterprise. Additionally, users can always upload their Docker creations to Docker hub, for free. Today, however, enterprises are keen on implementing the private registry, so images can be maintained in a secure manner.
Author
 |
Rakesh Krishna Madari was a Senior Technical Associate at Evoke Technologies. He was part of Evoke’s R&D team and was exploring DevOps technologies in order to make IT operations more efficient. He has hands-on experience in continuous integration, configuration management tools etc. Rakesh was primarily focused to enable enterprises adopt DevOps. |


2 Comments
This is the only time I see someone trying to setup a registry not as container. Also no one is using V1.
Firstly, thank you for taking time to post your comments.
Responding your comments, we had a requirement within our organization to setup a local private registry, which would help us pull/push and share the Docker images locally among senior developers and architects by granting access to the private registry.
I completely agree with you that there are two ways to create a Docker registry, one is as a package and the other is as a container. However, I have come across multiple blogs with an opinion that monitoring Docker registry as a container is a bit tricky, as it needs to be run using upstart scripts and configuration changes; whereas the Docker registry package just needs to start the service and keep the port open so that it is accessible.
In this post, I have created Docker registry as a package and set up a private registry. However, I would be publishing another post with Docker registry V2 shortly. Hope this helps, please feel free to reach out if you have any questions or queries.
Best Regards,
Rakesh